I was talking to a customer last week who was researching solar for her home, when she asked me where does the typical solar system fail? Easy question to answer, but not for the reasons most people might think.
It’s not solar panel failure, and it is not inverter failure, the #1 failure of solar systems is weatherproofing, mostly roof leaks. (Although if you get someone who drills through your weather barrier on your stucco it can also cause a leak.) Unlike most solar racking we do not subcontract our roofing; we use our own in-house staff for some very good reasons.
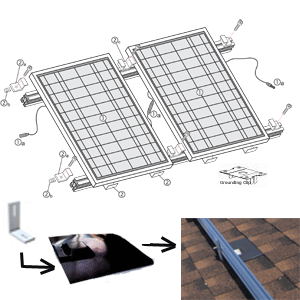
Solar roof racking starts with the attachment of the rack stand offs lag bolted to the homes roof rafters in most cases. There are some flat roof applications where ballasting is used, but it is rare in residential solar installations. When you are penetrating the roofing this is where you have to be particularly careful. Using approve and time-tested roofing techniques means you do not simply screw down through the shingles, caulk and attach the racking. (Called “stand-offs”). It is best to use metal flashing at the point of penetration installed in a weatherboard fashion with the shingles lapped over the top.
If you look at the diagrams in this blog post and the top picture, you will get some idea of the right way to anchor the solar rack.
Our solar roof racking and flashing of choice is manufactured by Schüco solar companies. What is cool about using the Schüco system is the folks in Germany have a long history of getting it right and have really put some thought into the way everything connects. Roof racking and flashing is arguably the most vulnerable part of solar roof installation. Of particular concern is the penetration of the standoff’s which keep the solar system elevated front he roof plane. Why do we raise the solar panels off the roof? Simple answer is ventilation to keep the panels as cool as possible. When the temperature of the solar panels increases past a certain point, their electrical production efficiency decreases.
With a Schüco solar products system, Schüco supplies all the solar panels, parts and inverters ensuring the highest operating efficiencies with compatible solar products. When you really look at the detail, you can see where this solar manufacture has applied their 50 plus years of experience and design. Stucco’s solar racking solutions and unique screw and locking bolt assemblies are designed and engineered to deliver high-value solutions to daily in-field solar installation challenges. Incorporating technologically advanced design, engineering, and manufacturing methods that only Schüco know how.
The roof is the most popular place to install solar but it is also very exposed so the mounting must be unaffected by high winds and corrosion. The roof mounted solar system should be solid, safe and sturdy without requiring too many roof penetrations.
Schüco has developed a solar installation system especially designed for residential roofs. The Schüco solar mounting system starts with parts that are manufactured in Canada. Schüco is in the process of moving more and more of their American solar parts to American plants. (We also love that about them). Because all the solar racking parts are engineered as compatible components, there is one universal stainless steel system screw.
Also unique to the Schüco system is their fast-installation anchor block and T-bolt with ball spring that holds the part in place while the solar installers completes the assembly. Slotted holes for vertical and lateral adjustments make solar installation a snap.
Most metal structures are held together only by the friction of the treads in the bolts. But extremes of temperature and weather can cause bolts to work loose. That’s why Schüco solar designed their bolts with a built-in locking shape that intrinsically holds the parts together. Once they’re in, there in to stay. The Schüco solar rack EZ bolt has a self locking head used to connect the EZ rails, stand-offs, anchors all with spring-loaded ball on the head of the bolt for easy adjustment of connections.
When you have the rack assembled, and your wiring and conduit ran, you are now ready to get to the sexy part of solar installation, the panels.
A couple of weeks ago in Northern California I was walking a customer through the parts of the racking system. The conversation turned to solar theft which is growing nationwide. Schüco considered that when they designed the solar panel module clips. They have a special tool that is slotted to tighten the screw head down which locks with a self locking screw head. This unique tool would prevent, or at least slow down, a would be solar panel thief if he did not come prepared for this particular screw head.
Portrait or landscape, which way to choose? There are advantages to both much of which depends on the roof you are trying to fit the solar panels to. In general, it is best to run the rails at right-angles to the rafters they will be bolted to. This gives greater flexibility in spacing the rails.
You should also generally orient the modules so the rails cross the short side of the panel if possible (portrait). This way requires half the rail and less stand-offs which means fewer roof penetrations. Less labor to install the solar panels and fewer materials. However you mount your solar panel racking, always follow manufactures directions and use solar companies that care about the finished product and take ownership of the solar installation.
